Webhooks
Webhooks (also known as web callback) is a simple method that makes it easy for an app or system to provide real-time information whenever an event happens, that is, it is a way to passively receive data between two systems through of an HTTP POST.
Webhook notifications can be configured for one or more applications created in your Developer Dashboard.
Once configured, the Webhook will be sent whenever one or more registered events occur, avoiding a search job every minute in search of an answer and, consequently, a system overload and data loss whenever there is some situation. After receiving a notification on your platform, Mercado Pago will wait for a response to validate that you received it correctly
In this documentation, we will explain the necessary settings to receive messages (through the Dashboard or when creating payments), in addition to showing the necessary actions that you must take for Mercado Pago to validate that the notifications were properly received.
Configuration via Dashboard
Below, we will explain how to: specify the URLs that will be notified, configure the events from which notifications will be received, validate that the notifications you receive are sent by Mercado Pago and simulate the receipt of various types of notifications.
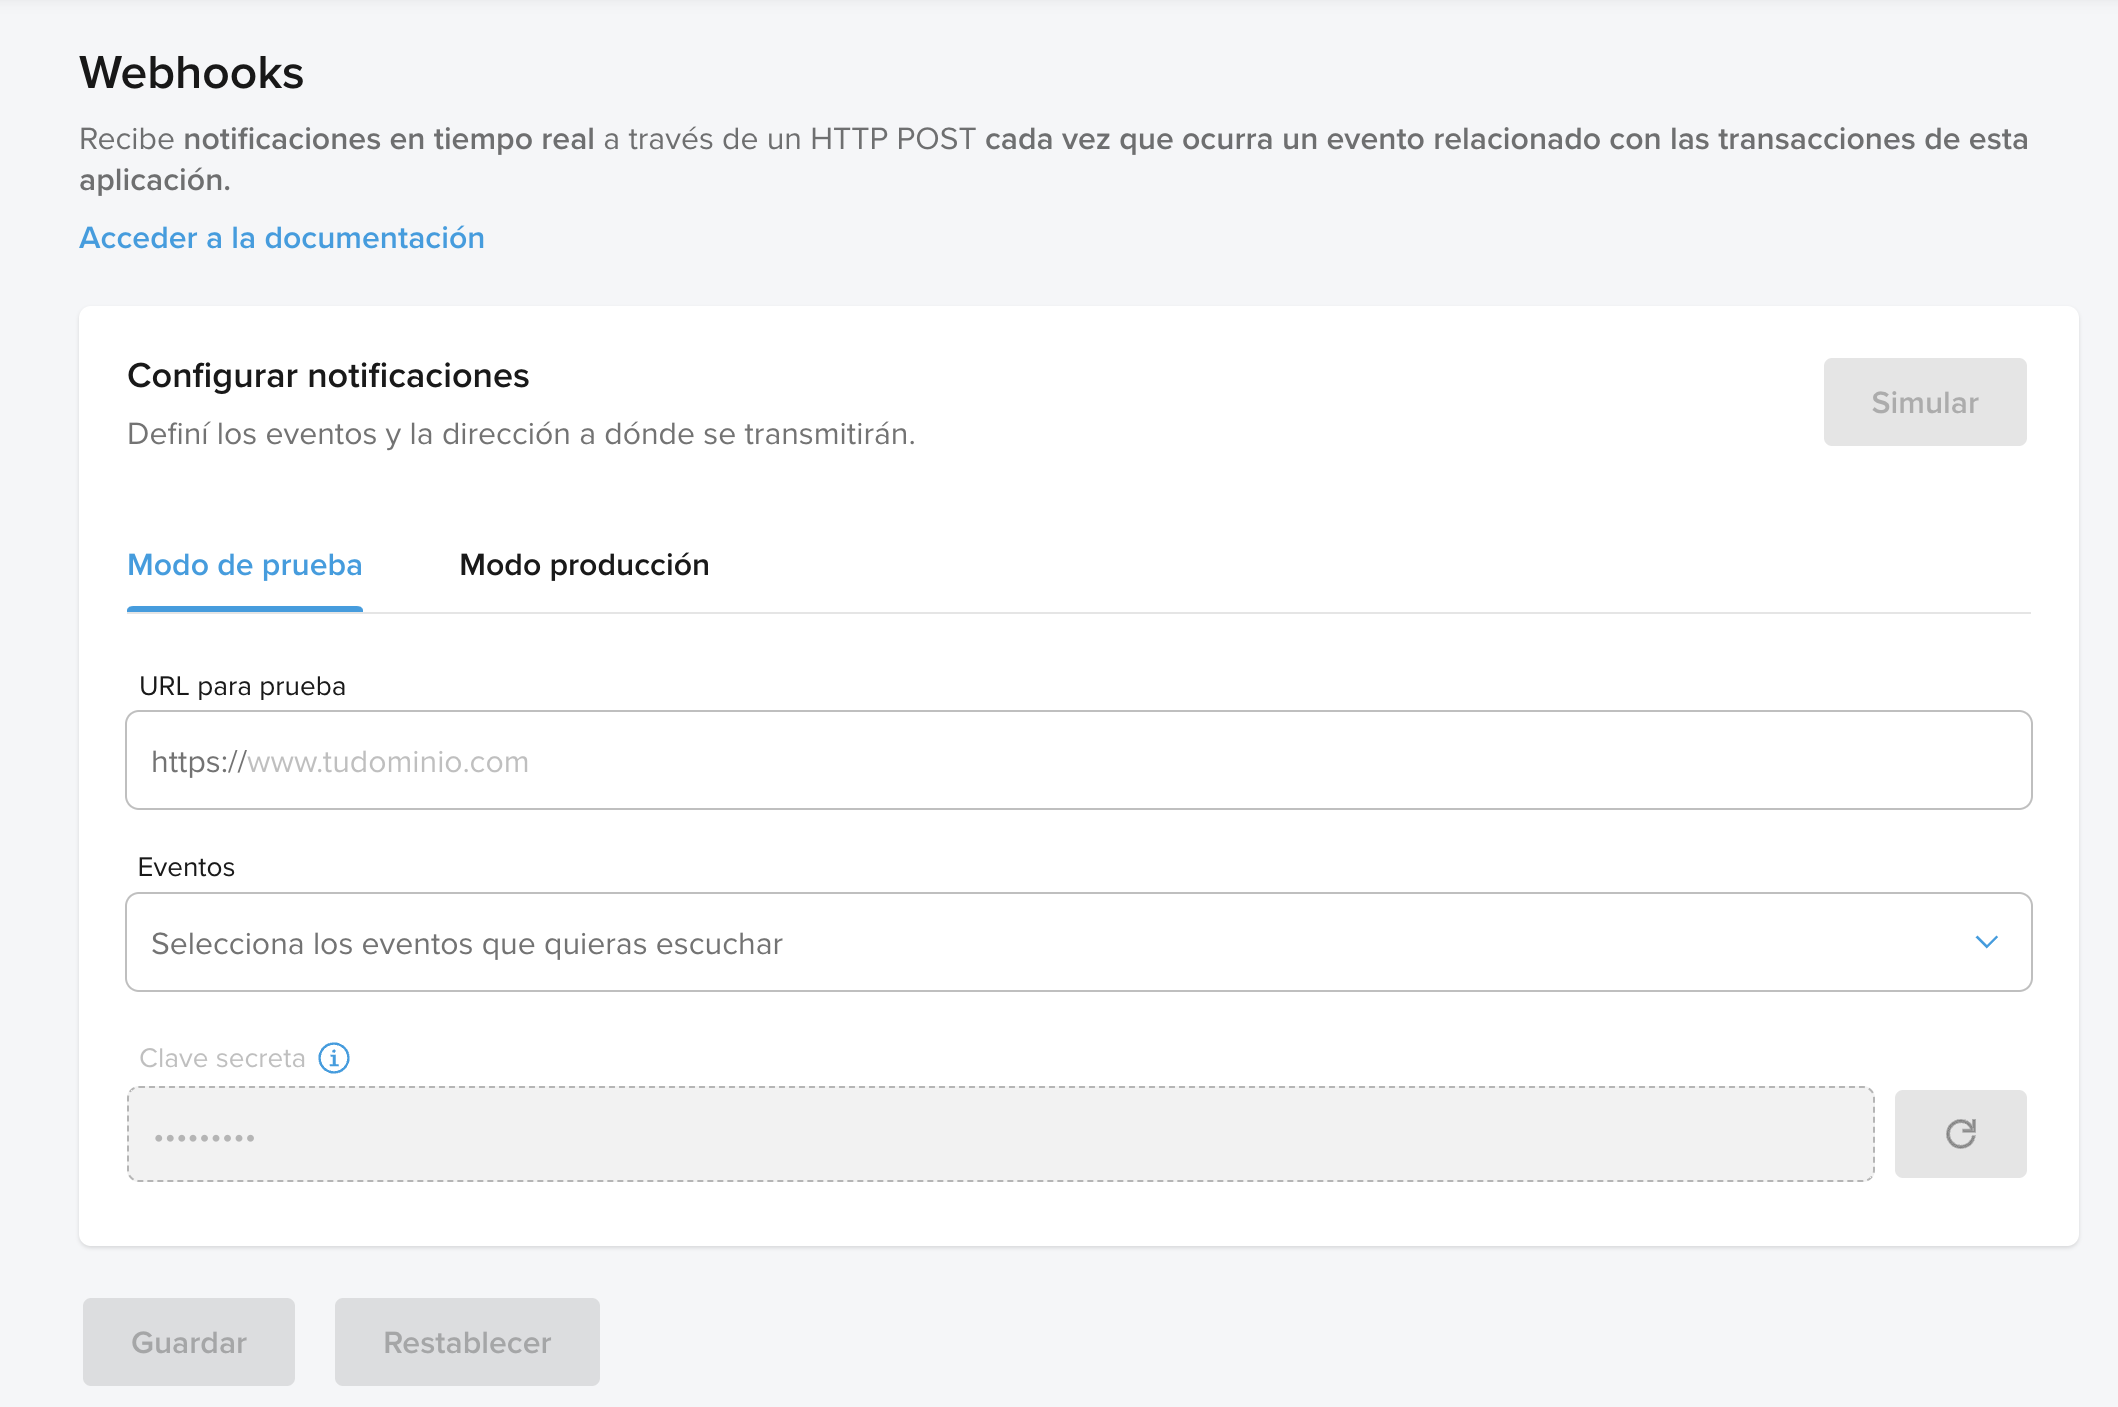
Configure URLs and Events
- If you haven't done so already, create an application in the Developer Dashboard.
- Once the application is created, navigate to the Webhooks section in the "Application details" page and configure the production and test URLs where notifications will be received.
- If you need to identify multiple accounts, at the end of the indicated URL you can indicate the parameter
?customer=(sellername) endpointto identify the sellers. - Next, select the events from which you will receive notifications in
jsonformat via anHTTP POSTto the URL specified above. An event is any type of update to the reported object, including status or attribute changes. See the events that can be configured in the table below.
| Notification Type | Action | Description |
payment | payment.created | Payment creation |
payment | payment.updated | Payment update |
mp-connect | application.deauthorized | Account unbinding |
mp-connect | application.authorized | Account linking |
subscription_preapproval | created - updated | Subscription |
subscription_preapproval_plan | created - updated | Subscription plan |
subscription_authorized_payment | created - updated | Recurring payment for a subscription |
point_integration_wh | state_FINISHED | Payment process completed |
point_integration_wh | state_CANCELED | Payment process canceled |
point_integration_wh | state_ERROR | An error occurred while processing the payment attempt |
delivery | delivery.updated | Shipping data and order update |
delivery_cancellation | case_created | Shipment cancellation request |
topic_claims_integration_wh | updated | Claims made by sales |
- Finally, click Save to generate a secret signature for the application. The signature is a validation method to ensure that the notifications received were sent by Mercado Pago, therefore, it is important to check the authenticity information to avoid fraud.
Validate notification origin
At the moment the registered URL receives a notification, you can validate whether the content sent in the x-signature header was sent by Mercado Pago, in order to enhance the security of receiving your notifications.
See below the step-by-step to configure this validation and at the end, we provide some SDKs with a complete code example to make your configuration process easier.
- Extract the timestamp (
ts) and the signature from thex-signatureheader. To do this, split the content of the header by the,character, resulting in a list of elements. The value for the prefixtsis the timestamp (in milliseconds) of the notification, andv1is the encrypted signature. Example:ts=1704908010andv1=618c85345248dd820d5fd456117c2ab2ef8eda45a0282ff693eac24131a5e839. - Using the template below, replace the parameters with the data received in your notification.
template
id:[data.id_url];request-id:[x-request-id_header];ts:[ts_header];In the template, values enclosed in [] should be replaced with the notification data, such as:
- Parameters with the
_urlsuffix come from query params. For example,[data.id_url]will be replaced by the value corresponding to the event ID (data.id). [ts_header]will be the value of ts extracted from the x-signature header.
- In the Developer Dashboard, select the integrated application, navigate to the Webhooks section, and reveal the generated secret signature.
- Generate the counter key for validation. To do this, calculate an HMAC with the
SHA256 hashfunction in hexadecimal, using the secret signature as the key and the populated template with the values as the message. For example:
$cyphedSignature = hash_hmac('sha256', $data, $key);
const crypto = require('crypto');
const cyphedSignature = crypto
.createHmac('sha256', secret)
.update(signatureTemplateParsed)
.digest('hex');
String cyphedSignature = new HmacUtils("HmacSHA256", secret).hmacHex(signedTemplate);
import hashlib, hmac, binascii
cyphedSignature = binascii.hexlify(hmac_sha256(secret.encode(), signedTemplate.encode()))
- Finally, compare the generated key with the key extracted from the header, ensuring they have an exact match. Additionally, you can use the timestamp extracted from the header for comparison with a timestamp generated at the time of receiving the notification to establish a tolerance for message reception delays.
Complete code example:
<?php // Obtain the x-signature value from the header $xSignature = $_SERVER['HTTP_X_SIGNATURE']; $xRequestId = $_SERVER['HTTP_X_REQUEST_ID']; // Obtain Query params related to the request URL $queryParams = $_GET; // Extract the "data.id" from the query params $dataID = isset($queryParams['data.id']) ? $queryParams['data.id'] : ''; // Separating the x-signature into parts $parts = explode(',', $xSignature); // Initializing variables to store ts and hash $ts = null; $hash = null; // Iterate over the values to obtain ts and v1 foreach ($parts as $part) { // Split each part into key and value $keyValue = explode('=', $part, 2); if (count($keyValue) == 2) { $key = trim($keyValue[0]); $value = trim($keyValue[1]); if ($key === "ts") { $ts = $value; } elseif ($key === "v1") { $hash = $value; } } } // Obtain the secret key for the user/application from Mercadopago developers site $secret = "your_secret_key_here"; // Generate the manifest string $manifest = "id:$dataID;request-id:$xRequestId;ts:$ts;"; // Create an HMAC signature defining the hash type and the key as a byte array $sha = hash_hmac('sha256', $manifest, $secret); if ($sha === $hash) { // HMAC verification passed echo "HMAC verification passed"; } else { // HMAC verification failed echo "HMAC verification failed"; } ?>// Obtain the x-signature value from the header const xSignature = headers['x-signature']; // Assuming headers is an object containing request headers const xRequestId = headers['x-request-id']; // Assuming headers is an object containing request headers // Obtain Query params related to the request URL const urlParams = new URLSearchParams(window.location.search); const dataID = urlParams.get('data.id'); // Separating the x-signature into parts const parts = xSignature.split(','); // Initializing variables to store ts and hash let ts; let hash; // Iterate over the values to obtain ts and v1 parts.forEach(part => { // Split each part into key and value const [key, value] = part.split('='); if (key && value) { const trimmedKey = key.trim(); const trimmedValue = value.trim(); if (trimmedKey === 'ts') { ts = trimmedValue; } else if (trimmedKey === 'v1') { hash = trimmedValue; } } }); // Obtain the secret key for the user/application from Mercadopago developers site const secret = 'your_secret_key_here'; // Generate the manifest string const manifest = `id:${dataID};request-id:${xRequestId};ts:${ts};`; // Create an HMAC signature const hmac = crypto.createHmac('sha256', secret); hmac.update(manifest); // Obtain the hash result as a hexadecimal string const sha = hmac.digest('hex'); if (sha === hash) { // HMAC verification passed console.log("HMAC verification passed"); } else { // HMAC verification failed console.log("HMAC verification failed"); }import hashlib import hmac import urllib.parse # Obtain the x-signature value from the header xSignature = request.headers.get("x-signature") xRequestId = request.headers.get("x-request-id") # Obtain Query params related to the request URL queryParams = urllib.parse.parse_qs(request.url.query) # Extract the "data.id" from the query params dataID = queryParams.get("data.id", [""])[0] # Separating the x-signature into parts parts = xSignature.split(",") # Initializing variables to store ts and hash ts = None hash = None # Iterate over the values to obtain ts and v1 for part in parts: # Split each part into key and value keyValue = part.split("=", 1) if len(keyValue) == 2: key = keyValue[0].strip() value = keyValue[1].strip() if key == "ts": ts = value elif key == "v1": hash = value # Obtain the secret key for the user/application from Mercadopago developers site secret = "your_secret_key_here" # Generate the manifest string manifest = f"id:{dataID};request-id:{xRequestId};ts:{ts};" # Create an HMAC signature defining the hash type and the key as a byte array hmac_obj = hmac.new(secret.encode(), msg=manifest.encode(), digestmod=hashlib.sha256) # Obtain the hash result as a hexadecimal string sha = hmac_obj.hexdigest() if sha == hash: # HMAC verification passed print("HMAC verification passed") else: # HMAC verification failed print("HMAC verification failed")import ( "crypto/hmac" "crypto/sha256" "encoding/hex" "fmt" "net/http" "strings" ) func main() { http.HandleFunc("/", func(w http.ResponseWriter, r *http.Request) { // Obtain the x-signature value from the header xSignature := r.Header.Get("x-signature") xRequestId := r.Header.Get("x-request-id") // Obtain Query params related to the request URL queryParams := r.URL.Query() // Extract the "data.id" from the query params dataID := queryParams.Get("data.id") // Separating the x-signature into parts parts := strings.Split(xSignature, ",") // Initializing variables to store ts and hash var ts, hash string // Iterate over the values to obtain ts and v1 for _, part := range parts { // Split each part into key and value keyValue := strings.SplitN(part, "=", 2) if len(keyValue) == 2 { key := strings.TrimSpace(keyValue[0]) value := strings.TrimSpace(keyValue[1]) if key == "ts" { ts = value } else if key == "v1" { hash = value } } } // Get secret key/token for specific user/application from Mercadopago developers site secret := "your_secret_key_here" // Generate the manifest string manifest := fmt.Sprintf("id:%v;request-id:%v;ts:%v;", dataID, xRequestId, ts) // Create an HMAC signature defining the hash type and the key as a byte array hmac := hmac.New(sha256.New, []byte(secret)) hmac.Write([]byte(manifest)) // Obtain the hash result as a hexadecimal string sha := hex.EncodeToString(hmac.Sum(nil)) if sha == hash { // HMAC verification passed fmt.Println("HMAC verification passed") } else { // HMAC verification failed fmt.Println("HMAC verification failed") } }) }
Simulate notification receipt
- After configuring the URLs and Events, click Simulate to experiment and test if the indicated URL is receiving notifications correctly.
- On the relevant screen, select the URL to be tested, which can be either the test or production URL.
- Next, choose the event type and enter the identification that will be sent in the notification body.
- Finally, click Send test to check the request, the server's response and the event description.
Setup while creating payments
It is possible to configure the notification URL more specifically for each payment using the notification_url field. See below how to do this using the SDKs.
- In the
notification_urlfield, indicate the URL from which notifications will be received, as shown below.
<?php
$client = new PaymentClient();
$body = [
'transaction_amount' => 100,
'token' => 'token',
'description' => 'description',
'installments' => 1,
'payment_method_id' => 'visa',
'notification_url' => 'http://test.com',
'payer' => array(
'email' => 'test@test.com',
'identification' => array(
'type' => 'CPF',
'number' => '19119119100'
)
)
];
$client->create(body);
?>
const client = new MercadoPagoConfig({ accessToken: 'ACCESS_TOKEN' });
const payment = new Payment(client);
const body = {
transaction_amount: '100',
token: 'token',
description: 'description',
installments: 1,
payment_method_id: 'visa',
notification_url: 'http://test.com',
payer: {
email: 'test@test.com',
identification: {
type: 'CPF',
number: '19119119100'
}
}
};
payment.create({ body: body, requestOptions: { idempotencyKey: '<SOME_UNIQUE_VALUE>' } }).then(console.log).catch(console.log);
MercadoPago.SDK.setAccessToken("YOUR_ACCESS_TOKEN");
Payment payment = new Payment();
payment.setTransactionAmount(Float.valueOf(request.getParameter("transactionAmount")))
.setToken(request.getParameter("token"))
.setDescription(request.getParameter("description"))
.setInstallments(Integer.valueOf(request.getParameter("installments")))
.setPaymentMethodId(request.getParameter("paymentMethodId"))
.setNotificationUrl("http://requestbin.fullcontact.com/1ogudgk1");
Identification identification = new Identification();
identification.setType(request.getParameter("docType"))
.setNumber(request.getParameter("docNumber"));
Payer payer = new Payer();
payer.setEmail(request.getParameter("email"))
.setIdentification(identification);
payment.setPayer(payer);
payment.save();
System.out.println(payment.getStatus());
require 'mercadopago'
sdk = Mercadopago::SDK.new('YOUR_ACCESS_TOKEN')
payment_data = {
transaction_amount: params[:transactionAmount].to_f,
token: params[:token],
description: params[:description],
installments: params[:installments].to_i,
payment_method_id: params[:paymentMethodId],
notification_url: "http://requestbin.fullcontact.com/1ogudgk1",
payer: {
email: params[:email],
identification: {
type: params[:docType],
number: params[:docNumber]
}
}
}
payment_response = sdk.payment.create(payment_data)
payment = payment_response[:response]
puts payment
using System;
using MercadoPago.Client.Common;
using MercadoPago.Client.Payment;
using MercadoPago.Config;
using MercadoPago.Resource.Payment;
MercadoPagoConfig.AccessToken = "YOUR_ACCESS_TOKEN";
var paymentRequest = new PaymentCreateRequest
{
TransactionAmount = decimal.Parse(Request["transactionAmount"]),
Token = Request["token"],
Description = Request["description"],
Installments = int.Parse(Request["installments"]),
PaymentMethodId = Request["paymentMethodId"],
NotificationUrl = "http://requestbin.fullcontact.com/1ogudgk1",
Payer = new PaymentPayerRequest
{
Email = Request["email"],
Identification = new IdentificationRequest
{
Type = Request["docType"],
Number = Request["docNumber"],
},
},
};
var client = new PaymentClient();
Payment payment = await client.CreateAsync(paymentRequest);
Console.WriteLine(payment.Status);
import mercadopago
sdk = mercadopago.SDK("ACCESS_TOKEN")
payment_data = {
"transaction_amount": float(request.POST.get("transaction_amount")),
"token": request.POST.get("token"),
"description": request.POST.get("description"),
"installments": int(request.POST.get("installments")),
"payment_method_id": request.POST.get("payment_method_id"),
"notification_url" = "http://requestbin.fullcontact.com/1ogudgk1",
"payer": {
"email": request.POST.get("email"),
"identification": {
"type": request.POST.get("type"),
"number": request.POST.get("number")
}
}
}
payment_response = sdk.payment().create(payment_data)
payment = payment_response["response"]
print(payment)
accessToken := "{{ACCESS_TOKEN}}"
cfg, err := config.New(accessToken)
if err != nil {
fmt.Println(err)
return
}
client := payment.NewClient(cfg)
request := payment.Request{
TransactionAmount: <transactionAmount>,
Token: <token>,
Description: <description>,
Installments: <installments>,
PaymentMethodID: <paymentMethodId>,
NotificationURL: "https:/mysite.com/notifications/new",
Payer: &payment.PayerRequest{
Email: <email>,
Identification: &payment.IdentificationRequest{
Type: <type>,
Number: <number>,
},
},
}
resource, err := client.Create(context.Background(), request)
if err != nil {
fmt.Println(err)
}
fmt.Println(resource)
curl -X POST \
-H 'accept: application/json' \
-H 'content-type: application/json' \
-H 'Authorization: Bearer YOUR_ACCESS_TOKEN' \
'https://api.mercadopago.com/v1/payments' \
-d '{
"transaction_amount": 100,
"token": "ff8080814c11e237014c1ff593b57b4d",
"description": "Blue shirt",
"installments": 1,
"payment_method_id": "visa",
"issuer_id": 310,
"notification_url": "http://requestbin.fullcontact.com/1ogudgk1",
"payer": {
"email": "test@test.com"
}
}'
- Implement the notifications receiver using the following code as an example:
php
<?php
MercadoPago\SDK::setAccessToken("ENV_ACCESS_TOKEN");
switch($_POST["type"]) {
case "payment":
$payment = MercadoPago\Payment::find_by_id($_POST["data"]["id"]);
break;
case "plan":
$plan = MercadoPago\Plan::find_by_id($_POST["data"]["id"]);
break;
case "subscription":
$plan = MercadoPago\Subscription::find_by_id($_POST["data"]["id"]);
break;
case "invoice":
$plan = MercadoPago\Invoice::find_by_id($_POST["data"]["id"]);
break;
case "point_integrartion_wh":
// $_POST contains the information related to the notification.
break;
}
?>- Once the necessary settings have been made, the notification via Webhook will have the following format:
json
{
"id": 12345,
"live_mode": true,
"type": "payment",
"date_created": "2015-03-25T10:04:58.396-04:00",
"user_id": 44444,
"api_version": "v1",
"action": "payment.created",
"data": {
"id": "999999999"
}
}This indicates that payment 999999999 was created for user 44444 in production mode with API version V1 and that this event occurred on date 2016-03-25T10:04:58.396-04 :00.
| Attribute | Description |
| id | Notification ID |
| live_mode | Indicates if the URL entered is valid. |
| type | Type of notification received (payments, mp-connect, subscription, claim, etc) |
| date_created | Resorce creation date |
| user_id | Vendor UserID |
| api_version | Indicates if it is a duplicate notification or not |
| action | Type of notification received, indicating whether it is the update of a resource or the creation of a new |
| data - id | ID of the payment, merchant_order or claim |
| attempts (delivery) | Number of times a notification was sent |
| received (delivery) | Resource Creation Date |
| resource (delivery) | Type of notification received, indicating whether this is an update to a feature or the creation of a new one |
| sent (delivery) | Notification sent date |
| topic (delivery) | Type of notification received |
| resource (claims) | Type of notification received, indicating notifications related to claims made by sales |
- If you want to receive notifications only from Webhook and not from IPN, you can add in the
notification_urlthe parametersource_news=webhook. For example: https://www.yourserver.com/notifications?source_news=webhooks
Actions required after receiving notification
When you receive a notification on your platform, Mercado Pago waits for a response to validate that you received it correctly. For that, you must return an HTTP STATUS 200 (OK) or 201 (CREATED). If this response is not sent, it will be understood that you have not received the notification and a further attempt to send it will be made until you submit the response.
In the table below you can find the main events, deadlines and waiting time for receiving new notification attempts.
| Event | Deadline after the first dispatch | Confirmation waiting time |
| Shipping | - | 22 seconds |
| First try | 15 minutes | 5 seconds |
| Second attempt | 30 minutes | 5 seconds |
| Third attempt | 6 hours | 5 seconds |
| Fourth attempt | 48 hours | 5 seconds |
| Fifth attempt | 96 hours | 5 seconds |
After returning the notification and confirming its receipt, you will obtain the full information of the notified resource by accessing the corresponding API endpoint:
| Type | URL | Documentation |
| payment | https://api.mercadopago.com/v1/payments/[ID] | check documentation |
| subscription_preapproval | https://api.mercadopago.com/preapproval | check documentation |
| subscription_preapproval_plan | https://api.mercadopago.com/preapproval_plan | check documentation |
| subscription_authorized_payment | https://api.mercadopago.com/authorized_payments | check documentation |
| point_integration_wh | - | check documentation |
| delivery | - | check documentation |
| topic_claims_integration_wh | https://api.mercadopago.com/claim_resource | check documentation |
Also, specifically in fraud alerts, you must not deliver the order and you will need to do the cancellation through the cancellations API.
In the notification, you will receive a JSON with the following information containing the payment id to cancel.
json
"description": ".....",
"merchant_order": 4945357007,
"payment_id": 23064274473
With this information, you will be able to carry out the necessary updates to your platform, such as updating an approved payment.